OkHttp 源码阅读
主要关注 OkHttp 各连接器执行内容,阅读的源码版本:3.8.0
OkHttp 的源码其实挺多的,但是不能读,因为他就是为了实现一个网络请求,其中最主要的就是两种方法进行网络请求,一个是 excute 另一个为 enqueue。两者的区别在于前者是立即执行,后者是将其放在一个请求队列中进行,但他们最终都会调用 getResponseWithInterceptorChain 进行发起请求和接收响应。
getResponseWithInterceptorChain
OkHttp 中最重要的方法我觉得就是这个方法,这个方法内 okhttp 将所有的 Interceptor 放在一个 list 中,然后组装成一个 RealInterceptorChain 类,紧接着调用了 chain.proceed 方法开始执行一个网络请求的发送 Request 和接受 Response。
Response getResponseWithInterceptorChain() throws IOException {
  // Build a full stack of interceptors.
  List<Interceptor> interceptors = new ArrayList<>();
  interceptors.addAll(client.interceptors());
  interceptors.add(retryAndFollowUpInterceptor);
  interceptors.add(new BridgeInterceptor(client.cookieJar()));
  interceptors.add(new CacheInterceptor(client.internalCache()));
  interceptors.add(new ConnectInterceptor(client));
  if (!forWebSocket) {
    interceptors.addAll(client.networkInterceptors());
  }
  interceptors.add(new CallServerInterceptor(forWebSocket));

  Interceptor.Chain chain = new RealInterceptorChain(
      interceptors, null, null, null, 0, originalRequest);
  return chain.proceed(originalRequest);
}
其内部就是利用递归调用 List 中的每一个 Interceptor。每个 Interceptor 又分为两部分,chain.proceed 之前和之后的内容。process 之前的方法是在请求发起之前调用,process 之后的内容则是在服务器响应后调用。
如此一来,各个 Interceptor 调用的顺序就变成了下面这个样子。
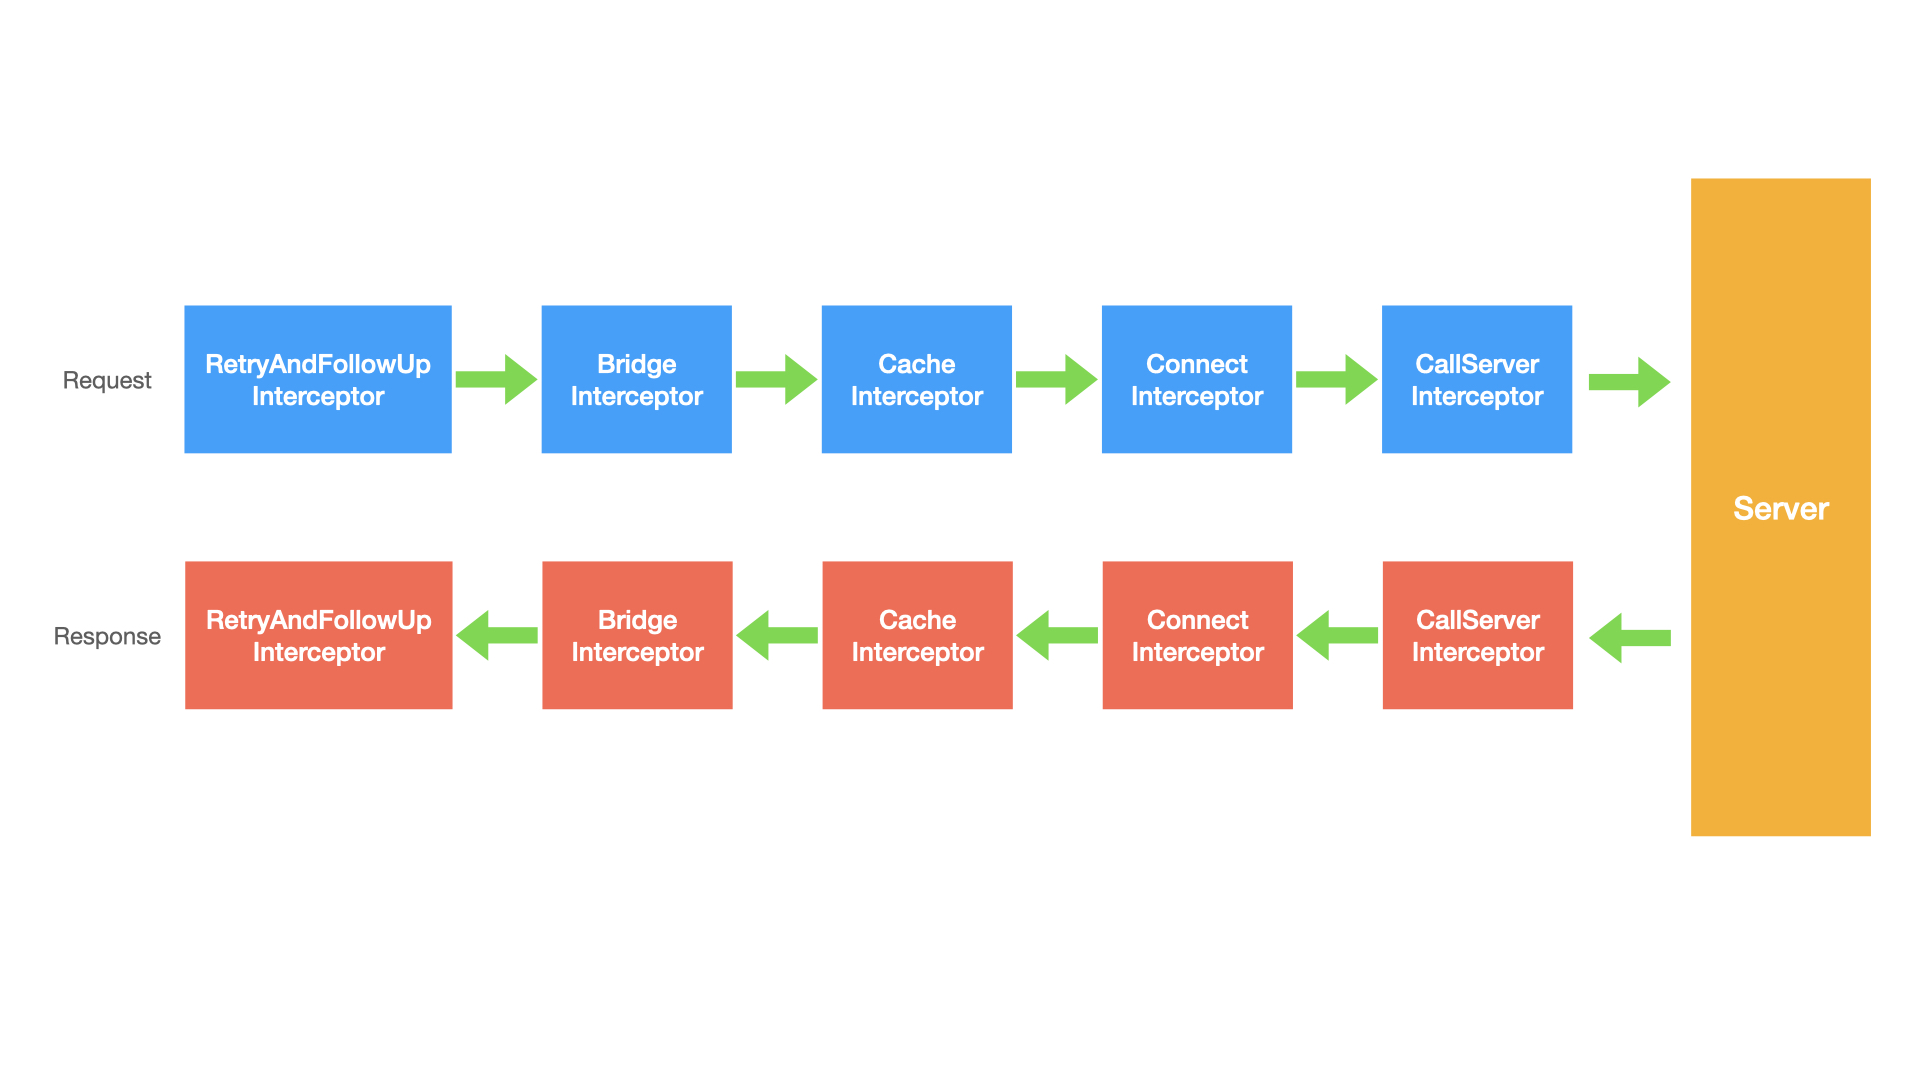
在请求发起时的第一个执行的,处理响应的也是最后一个。
接下来我就按照发起请求的顺序依次介绍一下各个 Interceptor,下面开始第一个也就是 RetryAndFollowUpInterceptor 。
RetryAndFollowUpInterceptor
看这个类名我们也能猜到,这个类主要是做重试和跳转的,重试是什么?重试就是出现错误之后的再次请求;那跳转呢?跳转就是服务器返回的并不是真正的资源信息而是告诉我们一个地址,让我们去那里看看,也叫重定向。
这里的跳转并不是只做关于重定向的,还有些其他的内容,现在只需要记住进行了重定向即可。
之前说了,每个 Interceptor 分为 proceed 之前一部分和之后一部分。之前的一部分是负责处理 Request 内容相关的,proceed 之后的内容则是处理 Response 内容相关,那既然这个 RetryAndFollowUpInterceptor 是负责做重试和跳转的是不是就只做 proceed 之后的内容?是不是我们接着看。
Request request = chain.request();

streamAllocation = new StreamAllocation(
    client.connectionPool(), createAddress(request.url()), callStackTrace);
事实上 RetryAndFollowUpInterceptor 在 proceed 之前只做了这么两件事,第一个是获取当前的 Request,第二个就是利用 okHttpClient 以及 Request 创建出一个 StreamAllocation 对象。
- 这里说的只做两件事是简化后一些不重要的代码后的结果,如果很严谨的说,调用 proceed 方法之前还有其他的检查、状态设置的代码,不过不在本文的讨论范围之内。
- SteamAllocation 可以把它看做是一个与服务器的连接。
接下来的一部分代码都是围绕着 proceed 这个方法。外部是一个条件始终为 true 的 while 循环,循环体内使用 trr-catch 调用 proceed 方法并处理各种异常情况,直到不能跳转、重试为止。
了解 RetryAndFollowUpInterceptor 的主要作用之后,接下一起来看下它是怎么实现的。
Response response = null;
boolean releaseConnection = true;
try {
  response = ((RealInterceptorChain) chain).proceed(request, streamAllocation, null, null);
  releaseConnection = false;
} catch (RouteException e) {
  // The attempt to connect via a route failed. The request will not have been sent.
  if (!recover(e.getLastConnectException(), false, request)) {
    throw e.getLastConnectException();
  }
  releaseConnection = false;
  continue;
} catch (IOException e) {
  // An attempt to communicate with a server failed. The request may have been sent.
  boolean requestSendStarted = !(e instanceof ConnectionShutdownException);
  if (!recover(e, requestSendStarted, request)) throw e;
  releaseConnection = false;
  continue;
} finally {
  // We're throwing an unchecked exception. Release any resources.
  if (releaseConnection) {
    streamAllocation.streamFailed(null);
    streamAllocation.release();
  }
}
可以看到,首先是通过 proceed 获取到一个 Response 对象,并根据一些错误条件来决定是否释放 streamAllocation。这个释放资源 streamAllocation#release 就相当于关闭了与服务器的连接。
接下来就是根据得到的 Response 来判断是否可以跳转、重试。总的来说就是根据 Response Status Code、最大允许跳转次数等特殊处理判断是否终止重试过程还是直接返回 Response。
Request followUp = followUpRequest(response);
if (followUp == null) {
  if (!forWebSocket) {
    streamAllocation.release();
  }
  return response;
}

private Request followUpRequest(Response userResponse) throws IOException {
  ...
    int responseCode = userResponse.code();
    final String method = userResponse.request().method();
    switch (responseCode) {
      case HTTP_PROXY_AUTH:
        ...
        return client.proxyAuthenticator().authenticate(route, userResponse);
      case HTTP_UNAUTHORIZED:
        return client.authenticator().authenticate(route, userResponse);
      case HTTP_PERM_REDIRECT:
      case HTTP_TEMP_REDIRECT:
        if (!method.equals("GET") && !method.equals("HEAD")) {
          return null;
        }
      case HTTP_MULT_CHOICE:
      case HTTP_MOVED_PERM:
      case HTTP_MOVED_TEMP:
      case HTTP_SEE_OTHER:
        // Does the client allow redirects?
        if (!client.followRedirects()) return null;

        String location = userResponse.header("Location");
        if (location == null) return null;
        HttpUrl url = userResponse.request().url().resolve(location);

        // Don't follow redirects to unsupported protocols.
        if (url == null) return null;

        // If configured, don't follow redirects between SSL and non-SSL.
        boolean sameScheme = url.scheme().equals(userResponse.request().url().scheme());
        if (!sameScheme && !client.followSslRedirects()) return null;

        // Most redirects don't include a request body.
        Request.Builder requestBuilder = userResponse.request().newBuilder();
        if (HttpMethod.permitsRequestBody(method)) {
          final boolean maintainBody = HttpMethod.redirectsWithBody(method);
          if (HttpMethod.redirectsToGet(method)) {
            requestBuilder.method("GET", null);
          } else {
            RequestBody requestBody = maintainBody ? userResponse.request().body() : null;
            requestBuilder.method(method, requestBody);
          }
          if (!maintainBody) {
            requestBuilder.removeHeader("Transfer-Encoding");
            requestBuilder.removeHeader("Content-Length");
            requestBuilder.removeHeader("Content-Type");
          }
        }

        // When redirecting across hosts, drop all authentication headers. This
        // is potentially annoying to the application layer since they have no
        // way to retain them.
        if (!sameConnection(userResponse, url)) {
          requestBuilder.removeHeader("Authorization");
        }
        return requestBuilder.url(url).build();
      case HTTP_CLIENT_TIMEOUT:
        if (userResponse.request().body() instanceof UnrepeatableRequestBody) {
          return null;
        }
        return userResponse.request();
      default:
        return null;
    }
  }
ConnectInterceptor
ConnectInterceptor 的主要内容:
HttpCodec httpCodec = streamAllocation.newStream()client, doExtensiveHealthChecks);
RealConnection connection = streamAllocation.connection());
这里的 newStream 就是查找出一个新的连接并根据当前 HTTP 协议版本创建流。
点击进入 StreamAllocation#newStream 内部,主要有以下两行:
RealConnection resultConnection = findHealthyConnection(connectTimeout, readTimeout,
    writeTimeout, connectionRetryEnabled, doExtensiveHealthChecks);
HttpCodec resultCodec = resultConnection.newCodec(client, this);
第一步是查找出可用连接,第二步则使用可用连接建立起收入输出流,主要在更下层的 CallServerInterceptor 中使用。这里只关注如何找到第一步可用连接。
进入 findHealthyConnection 之后会发现,主要的查找方式还在另一个方法,findConnection 中,继续跟进。
步骤 1 状态检查
进入之后,先进行状态检查。
if (released) throw new IllegalStateException("released");
if (codec != null) throw new IllegalStateException("codec != null");
if (canceled) throw new IOException("Canceled");
步骤 2 已存在连接是否不允许复用
确认状态之后,再检查当前连接是否设置了不支持新开流。「初次连接会直接跳过,此时连接为空,第二次网络请求时,如果请求地址一致,且连接尚未断开,会进入判断当前连接是否设置了不支持新开流」。
// 尝试使用已分配的连接
RealConnection allocatedConnection = this.connection;
if (allocatedConnection != null && !allocatedConnection.noNewStreams) {
  // 连接不为空且,没设置过 noNewStreams 的连接可进行复用
  return allocatedConnection;
}
什么时候 noNewStream 为 true——不复用已有连接?「情况不明」
- 整个流完成;
- 释放了流;
- 禁止使用复用策略;
- 连接建立失败
- 已有可用连接、可支持 HTTP2 多路复用、创建出的连接不等于连接池已有连接「刚才没有,突然有的情况」?
步骤 3 从连接池中取出并检查
Internal.instance.get(connectionPool, address, this, null);
if (connection != null) {
  return connection;
}
这里的 Internal#instance 为 OkHttpClient 所持有的一个类,最终还是调用到 ConnectionPool#get 方法。
注:这里的 get 方法的最后一个参数为 null,这个是代表路由信息,初次尝试获取可用连接,不使用路由,即为取出直接连接到目标服务器的连接信息「如果设置了代理或其他信息」。
连接池内部持有一个队列,存放连接,get 方法就是遍历其中每个连接,并判断是否可用。判断的标准全在 RealConnection#isEligible 方法内,主要有一下几个考量标准。
- 当前连接的可承载的标准
- 超出配置的连接数
- 设置了不接受新的连接;
- 检查主机信息:
- dns
- 代理鉴权配置
- 协议类型
- Clipher Suits
- 代理
- sslSockFactor
- certificatePinner
- hostNameVerifier
- 端口号
- 主机 host
- 是否是 http2
- 代理类型、socket 代理地址是否相同
- 连接服务证书是否包含新连接地址的主机
- Certificate pinning 必须一致;
经过所有检查之后,会得到一个连接,此连接尚未真正连接。还需调用 StreamAllocation#acquire 方法,将当前连接加入到 StreamAllocation#allocation 列表中,此列表就是上述第一个检查的第一小项,代表着当前连接的可连接数。
public void acquire(RealConnection connection) {
  assert (Thread.holdsLock(connectionPool));
  if (this.connection != null) throw new IllegalStateException();

  this.connection = connection;
  connection.allocations.add(new StreamAllocationReference(this, callStackTrace));
}
此处设置了 this.connection = connect,表明找到合适的连接。此时已经从连接池中找到,下面回到 StreamAllocation#findConnection 方法内部。
Internal.instance.get(connectionPool, address, this, null);
if (connection != null) {
  return connection;
}
以上代码如果找到连接,则直接 return,找不到时,则通过路由查找连接。
步骤 4 路由查找
通过检查 3 从连接池获取不到连接之后,就会从 RouteSelector 取一个 Route,这里的 Route 是参与连接的中间节点,可以先理解为一个代理。有了路由信息之后,会再次尝试从连接池中获取连接,这次也会带上路由信息。
为什么两次一个需要带路由,一个不带路由?
第一次不带路由,尝试取出直连源服务器的连接;
第二次带路由,取直连源服务器没取到,那就取连接代理服务器的连接;
if (selectedRoute == null) {
  selectedRoute = routeSelector.next();
}
Internal.instance.get(connectionPool, address, this, selectedRoute);
if (connection != null) return connection;
如果经历了从源服务器可用连接和代理服务器都取不到可用连接,则直接创建出一个 Connection,创建时传入了当前的路由信息。下次取出代理服务器可用连接时,期望能够匹配上。
route = selectedRoute;
refusedStreamCount = 0;
result = new RealConnection(connectionPool, selectedRoute);
acquire(result);
至此拿到一个可用连接后,将通过 RealConnection#connect 方法进行 tcp+tls 的握手。连接成功后:如果同时创建了另一个到同一地址的多路复用连接,则将当前连接废弃并释放资源,转而使用已有的可多路复用的连接。
if ()result.isMultiplexed())) {
        socket = Internal.instance.deduplicate()connectionPool, address, this);
        result = connection;
      }
步骤 5
经历完所有的连接获取也意味着 findConnection 执行的结束,此时会获取到一个候选连接,需要再次判断当前连接是否健康可用,比如: - 连接是否关闭 - 写入流是否关闭 - 写出流是否关闭
还会进行针对非 GET 请求的状态检查,比如:超时设置。 如果不可用将触发连接失败,并将取消对当前连接分为的资源:资源释放。
如果连接为可用连接,回到 StreamAllocation#newStream 方法内继续执行,并根据当前的连接信息生成一个 HttpCodec 实例化对象,HttpCodec 为接口,实现的类为:Htt1Codec、Http2Codec。
步骤 6
至此就执行完 ConnectInterceptor#Intercept。
CallServerInterceptor
CallServerInterceptor 主要就是利用 HttpCodec 进行数据流的收发。
// send request data
httpCodec.writeRequestHeaders(request);

Sink requestBodyOut = httpCodec.createRequestBody(request, request.body().contentLength());
BufferedSink bufferedRequestBody = Okio.buffer(requestBodyOut);
request.body().writeTo(bufferedRequestBody);
bufferedRequestBody.close();

// receive response data
responseBuilder = httpCodec.readResponseHeaders(false);
Response response = responseBuilder
        .request(request)
        .handshake(streamAllocation.connection().handshake())
        .sentRequestAtMillis(sentRequestMillis)
        .receivedResponseAtMillis(System.currentTimeMillis())
        .build();
response = response.newBuilder()
          .body(httpCodec.openResponseBody(response))
          .build();
这里的 HttpCodec 就是在 ConnectInterceptor 创建出的 HttpCodec,鉴于目前工作用到的均为 Http 1.1,这里就查看 Http1Codec。
步骤 1 writeRequestHeaders
进入这个方法后,首先就是通过 StringBuilder 创建一个 请求行的字符串,就是我们熟悉的 Request Line「请求行」。
GET /index HTTP/1.1
不过与我们所熟悉的请求行不同的是,如果当前请求是 HTTPS 且代理类型为 HTTP,请求行的 path 就变成了主机名+端口号的形式,需要告诉代理服务器目标地址是什么。
紧接着,就调用了 sink 也就是流,开始向流写入 Request Line ,结束后发送 \r\n 并开始循环发送 Header,每发送一个 header 后也需要发送 \r\n 。这就形成 HTTP 报文的基本格式。
POST /user HTTP/1.1      //请求行
Host: www.user.com
Content-Type: application/x-www-form-urlencoded
Connection: Keep-Alive
User-agent: Mozilla/5.0.
执行完 httpCodec 之后,再次回到 CallServerIntereptor 进行后续关于 Request 的操作。
步骤 2 writeRequestBody
在发送 Request Header 之后,会根据当前 Request Header 中是否包含 Expect: 100-continue 的头信息,如果包含了这个头信息则直接发送当前请求,并接受服务器响应。
- 关于 Expect 的解释:https://developer.mozilla.org/zh-CN/docs/Web/HTTP/Headers/Expect
- Expect 有种像是再次握手的处理,以此来保证服务器能够处理我的意图。比如:我要上传一个超大的文件,客户端想先问问服务器是否能够处理,就在 Header 中添加 Expect 方法,然后服务器收到请求后,根据服务器状态判断是否能够处理,如果能处理就返回 100,不能处理则返回 417。
- 返回 100 客户端继续发送后续内容;
- 返回 417 客户端将不需要将后续内容再次发送,因为服务器无法处理。
如果客户端没有发送 Expect: 100-continue 的 Header,则根据当前 Request Method 及是否具有 Request Body 进行构建 Request Body 进行发送。如何构建呢?
构建输出流
为什么需要构建输出流?
由于 HTTP 的 Request Body 可能有多种配置 Body 的编码方法,比如使用 chunked 形式发送数据,或是直接将 Body 发送出去。
常见的 Request Body 编码方式有:g-zip、chunked。chunked 比较特殊,它支持分段发送数据,它使用在发送消息前不知道当前的 ContentLength,但又不能长时间等待处理结束后再进行网络请求,就可以先发送一段,再发送一段,最后如果全部发送完成后,加上一个标志位。
Chunked 编码使用若干个 Chunk 串连而成,由一个标明长度为 0 的 chunk 标示结束。每个 Chunk 分为头部和正文两部分,头部内容指定下一段正文的字符总数( 十六进制的数字)和数量单位(一般不写),正文部分就是指定长度的实际内容,两部分之间用回车换行 (CRLF) 隔开。在最后一个长度为 0 的 Chunk 中的内容是称为 footer 的内容,是一些附加的 Header 信息(通常可以直接忽略)。——节选自 CSDN 博客。
关于 chunked 的解释:https://developer.mozilla.org/zh-CN/docs/Web/HTTP/Headers/Transfer-Encoding
刚才说了一种比较特殊的数据编码格式:在发送前无法确定长度,还有一种就是能确定发送长度。在 OkHttp 中把他们都看成了一个抽象的概念:输出流。分别的实现类:ChunkedSink 和 FixedLengthSink。
有了输出流,下面就可以进行向服务器发送报文了,但是我们都知道 Request Body 的报文格式可是有多种的,比如 FormBody 和 MultipartBody。
FormBody
将 key、value 用 = 进行连接,如果有多个 key value 使用 & 进行连接 key value 最终的格式为:
key1=value1&key2=value2 向服务器发送的内容也是如此。
for (int i = 0, size = encodedNames.size(); i < size; i++) {
  if (i > 0) buffer.writeByte('&');
  buffer.writeUtf8(encodedNames.get(i));
  buffer.writeByte('=');
  buffer.writeUtf8(encodedValues.get(i));
}
MultipartBody
Multipart 是一种可以发送多种类型的 Body 格式,比如一个 Body 可以有多个文件和一个字符串。在发送的时候,就需要循环 MultiPart 的列表,而且每一个 Part 均有对应的 Header 信息,记录着这个 Multipart 的数据格式(Content-Type)及长度(Content-Length)。
每发送一个之前,先发送分割信息:--[boundary] 分隔信息除了 boundary 可能是用户设置或 uuid 其他均为固定值。
接下来就是发送 Multipart 的 Header。header 的格式:
key1: value1
key2: value2
然后发送 Content-Type、Content-Length,最后发送实际的内容:Body「二进制内容或文字」这还不算完。
全部发送完成后需要再次发送分割信息。
for (int p = 0, partCount = parts.size(); p < partCount; p++) {
      Part part = parts.get(p);
      Headers headers = part.headers;
      RequestBody body = part.body;

      sink.write(DASHDASH);
      sink.write(boundary);
      sink.write(CRLF);

      if (headers != null) {
        for (int h = 0, headerCount = headers.size(); h < headerCount; h++) {
          sink.writeUtf8(headers.name(h))
              .write(COLONSPACE)
              .writeUtf8(headers.value(h))
              .write(CRLF);
        }
      }

      MediaType contentType = body.contentType();
      if (contentType != null) {
        sink.writeUtf8("Content-Type: ")
            .writeUtf8(contentType.toString())
            .write(CRLF);
      }

      long contentLength = body.contentLength();
      if (contentLength != -1) {
        sink.writeUtf8("Content-Length: ")
            .writeDecimalLong(contentLength)
            .write(CRLF);
      } else if (countBytes) {
        // We can't measure the body's size without the sizes of its components.
        byteCountBuffer.clear();
        return -1L;
      }

      sink.write(CRLF);

      if (countBytes) {
        byteCount += contentLength;
      } else {
        body.writeTo(sink);
      }

      sink.write(CRLF);
    }

    sink.write(DASHDASH);
    sink.write(boundary);
    sink.write(DASHDASH);
    sink.write(CRLF);
到此 Request Body 算是发送完成。
接下来开始接受服务器返回内容了。
步骤 3 receiveResponse
首先判断 ResponseBuilder 是否为空,为什么先判断是否为空呢?因为在 步骤 2 发送 chunked 信息时,会尝试创建一个 ResponseBuilder,如果服务器返回了 100 才会把 responseBuilder 设置为空,如果服务器返回了 417 ,OKhttp 则需要将这个错误信息向上传递给用户层。
下面我们来看一下如何创建一个 ResponseBuilder,其实就是利用服务器返回的输入流,构建出 Response Line 和 Response Header。
StatusLine statusLine = StatusLine.parse(source.readUtf8LineStrict());

Response.Builder responseBuilder = new Response.Builder()
    .protocol(statusLine.protocol)
    .code(statusLine.code)
    .message(statusLine.message)
    .headers(readHeaders());
拿到一个 Response Builder 之后,需要向其中添加一下参数,并构建出一个 Response,添加的参数有 request、handShake、请求发出时间戳、请求结束时间戳「当前时间戳」。另外如果当前请求是来自 webSocket 并且服务器返回的 Response Code 为 101 则将 Response Body 设置为空消息,反之则从 httpCodec 中提取中 body 内容。
int code = response.code();
if (forWebSocket && code == 101) {
  // Connection is upgrading, but we need to ensure interceptors see a non-null response body.
  response = response.newBuilder()
      .body(Util.EMPTY_RESPONSE)
      .build();
} else {
  response = response.newBuilder()
      .body(httpCodec.openResponseBody(response))
      .build();
}
服务器返回 101 表明将开始切换协议,比如从当前的 HTTP 协议切换至 WebSocket 协议。
详细信息参见:https://developer.mozilla.org/zh-CN/docs/Web/HTTP/Status/101
到此为止,CallServerInterceptor 算是执行完成了,也代表着整个网络请求的结束「从 Send Request 到 接收 Response」。我还忽略了一些小的细节,比如发送 Request 之后检查当前的 connection 是否支持多路复用「HTTP 2 的特点」以及收到 Response 之后针对 header 中 connection 的值进行判断是否支持连接复用等等。
讲完了 CallServerInterceptor 也算是 OkHttp 内容告一段落了,毕竟 getResponseWithInterceptorChain 是整个 OkHttp 的重点,下面将从其他类入手再看一下 OkHttp。